MQTT
Introduction
SolarAssistant provides an MQTT based API. MQTT is used by technical users to integrate and extend the functionality of SolarAssistant into their projects. It provides access to SolarAssistant monitoring data and inverter settings changes can also be performed.
Enable MQTT output
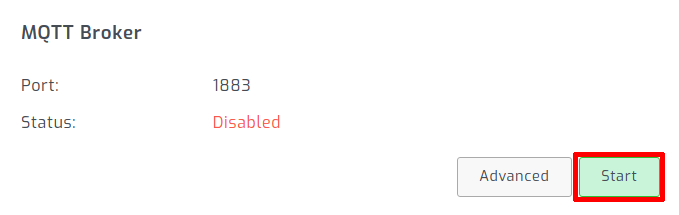
Navigate to the "Configuration" tab and start MQTT:
Determine SolarAssistant local network IP
Also on the "Configuration" tab, determine what it's wlan0 (WiFi) or eth0 (LAN) IP is.
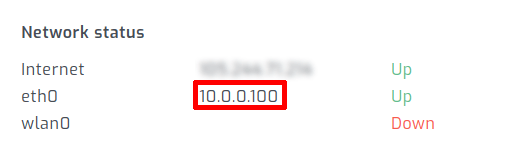
The IP is allocated by your network router and can usually be configured to be static in your router configuration. If your router supports mDNS then SolarAssistant will register the hostname below:
Connect to MQTT
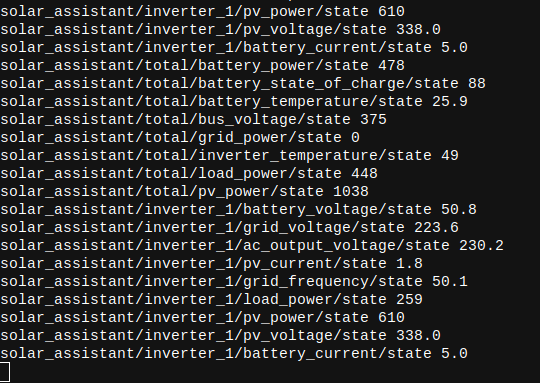
We suggest using MQTT explorer or mosquitto_sub to read MQTT messages. In the example below, we use the mosquitto_sub:
The result will be a continuous stream of MQTT messages. To exit, press ctrl-c.
MQTT Bridge
If you already have an MQTT broker where you would like to consume SolarAssistant messages then you need to set up an MQTT bridge. Using a bridge is considered best practice for reliability and latency as message delivery, network disconnects, etc. is handled by the MQTT brokers. For Home Assistant users please see our Home Assistant broker with bridge setup guide.
The example mosquitto configuration file below is used in your existing MQTT broker to pull messages from SolarAssistant. Note:
- address should be the IP address of your SolarAssistant device instead of 10.0.0.100.
- remote_username and remote_password should be uncommented if you configured MQTT authentication in SolarAssistant.
- topic in is to pull all messages from SolarAssistant
- topic out is to push solar setting change messages from your existing broker to SolarAssistant.
/etc/mosquitto/conf.d/solar-assistant.conf
#remote_username solar-assistant
#remote_password solar123
address 10.0.0.100
topic # in
topic solar_assistant/# out
Adjusting solar settings
See the example below for how to set the output source priority of an inverter via MQTT.
PUBoutput_source_prioritySet output source priority
| topic | string | solar_assistant/inverter_1/output_source_priority/set |
| input | string | e.g. Utility first |
Example
SolarAssistant will post a response back on topic solar_assistant/set/response_message/state. You can view these messages with the command below:
SUBresponse_message
| topic | string | solar_assistant/set/response_message/state |
| output | string | e.g. Saved |
Example
To discover all writable topics, enable Home Assistant discovery and run:
Deye inverter examples
PUBmax_grid_charge_currentSet maximum AC charge current
| topic | string | solar_assistant/inverter_1/max_grid_charge_current/set |
| input | integer | Amps, e.g. 20 |
Example
PUBcapacity_point_1Set work mode capacity point 1
| topic | string | solar_assistant/inverter_1/capacity_point_1/set |
| input | integer | Percentage, e.g. 15 |
Example
Common inverter examples:
PUBcharger_source_prioritySet charger source priority
| topic | string | solar_assistant/inverter_1/charger_source_priority/set |
| input | string | e.g. Solar and utility simultaneously |
Example
PUBmax_grid_charge_currentSet maximum AC charge current
| topic | string | solar_assistant/inverter_1/max_grid_charge_current/set |
| input | integer | Amps, e.g. 10 |
Example
PUBshutdown_battery_voltageSet shutdown battery voltage
| topic | string | solar_assistant/inverter_1/shutdown_battery_voltage/set |
| input | float | Volts, e.g. 47.0 |
Example
Using MQTT values in scripts
An easy way to get an MQTT value in a bash script is to subscribe to a specific topic and exit after one message is received. In the example below we connect to localhost as the script runs on the SolarAssistant unit. See SSH access for more detail.
LOAD_POWER=$(mosquitto_sub -h localhost -t 'solar_assistant/inverter_1/load_power' -C 1)
echo "Load power is: $LOAD_POWER"